On this page you can find all of the information for the Jennie's Thread-Along Block of the Month 2013

I shared the final set of instructions for the quilt top on 3rd February 2014. Despite some delays during the year I hope you like the finished quilt top. All of the instructions and patterns will remain here on the blog just as long as the blog itself remains, so there is no rush to complete your project and you can join in whenever you wish. Thank you for your patience and your encouragement!
2013 seems like it is going to become the year of BOMs. I've already signed up for a couple! But as well as taking part in others, I decided in the last few months that I would like to host one myself. I really hope you'll take a moment to have a look my BOM and I'd love it if you would join me.
Here is the first block!

And the SECOND BLOCK (2nd February)

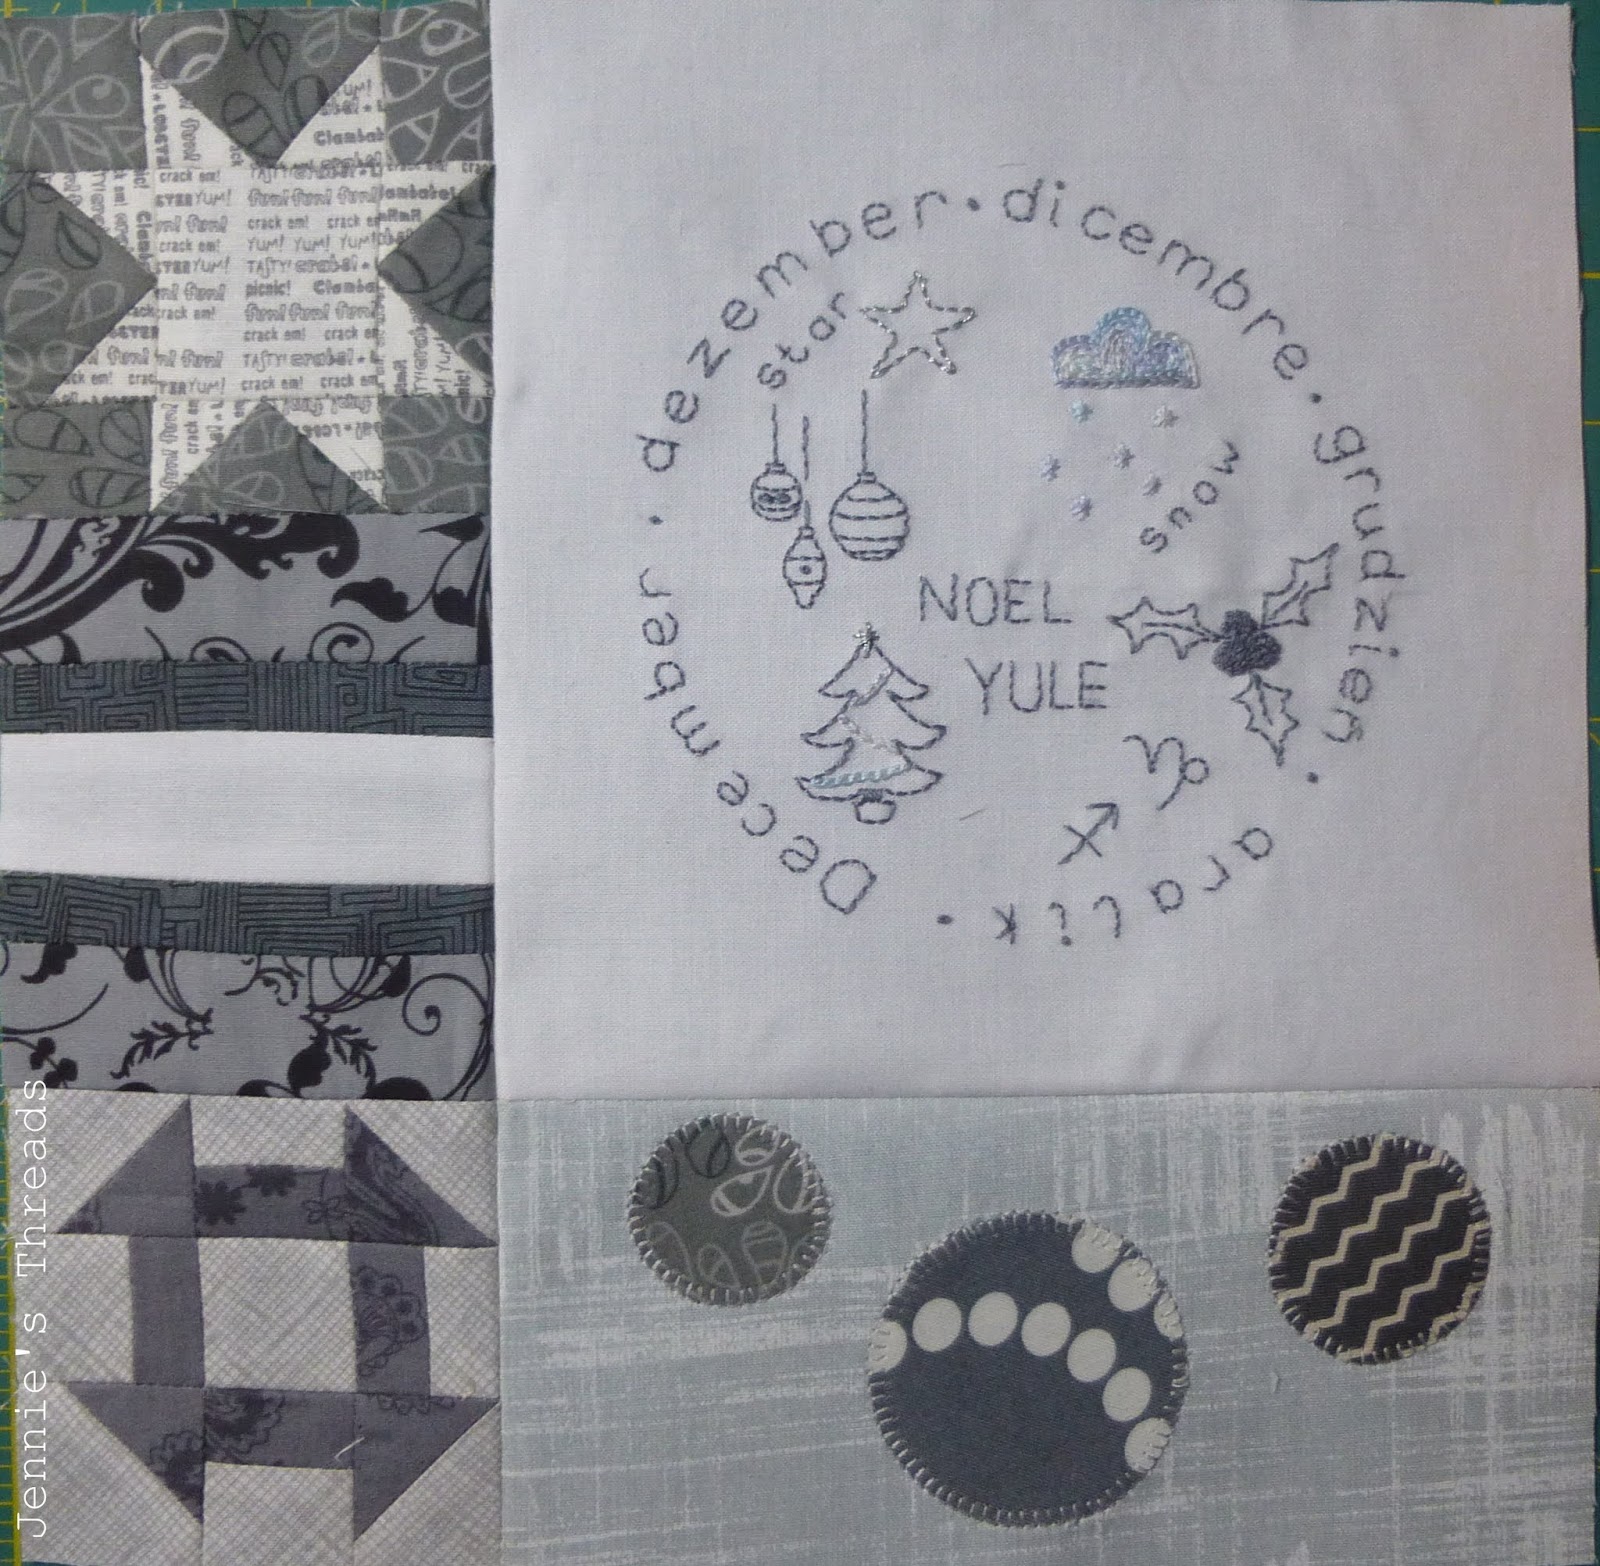
The THIRD BLOCK will be available on 2nd March 2013!
(I will update this with a picture of the full block just as soon as I've made it - for now, here is the embroidery) - NOW UPDATED!

The FOURTH BLOCK will be available on 6th April 2013.

The FIFTH BLOCK will be available on 4th May 2013

The SIXTH BLOCK will be available on 1st June 2013

The SEVENTH BLOCK will be available on 6th July 2013

The EIGHTH BLOCK will be available around 3rd August (but I'm on holiday so it may be a bit early - or a bit late!) So it's actually available 06.12.2013!

The NINTH BLOCK....

The TENTH Block

The ELEVENTH block

The TWELFTH block
Just the CENTRE block left to go....
The plan is some embroidery, some tiny piecing, some applique and a finished wall-hanging sized quiltat the end of the year. eventually.
Don't worry if you've never done any embroidery before - the designs are made up of small motifs so you can do just a couple of motifs at a time, and I'll be posting some tutorials as we go explaining the basic stitches.
There will be twelve blocks plus a centre and each block will reflect a month of the year and a colour from the colour wheel to give a rainbow finish. There will also be a straightforward applique section to each block and pieced section.
Of course, if tiny piecing isn't really your thing, then the size of the embroidery will fit perfectly in a 7" diameter embroidery hoop, or you could make a mini quilt for each month with a simple coloured border.
If you are thinking about taking part, I'd love it if you grabbed the button and added it to your blog
 I've also set up a Flickr Group here
I have bought a lot of fabric recently, and it's about time I started using it, so I will be using fabric in my stash. In fact the pieces are so small you can use your scraps. I'm going for a rainbow look, but if you have loads of scraps in just one colour, there's nothing to stop you from changing the colours around.
What you will need is 1 metre of the fabric you will use for the embroidery (ETA - you may find that 1.5m is safer - sorry). I've chosen Kona White. To further stabilise this fabric, I back my embroideries with a product called Bosal Fashion Fuse - it's a light weight fusible interfacing, and I think it makes my embroidery neater! I get mine from my LQS. Weaveline is another product I have used in the past (and I struggle to tell the difference). The Bosal Fashion Fuse is only 23" wide, so you'll need 180cm minimum.
I also find a Sew Line mechanical pencil to be invaluable for transferring the embroidery design onto the fabric - there is grey for transferring to light fabrics and yellow for transferring to dark fabrics. There are, of course, other ways of transferring your design onto your fabric: for example Kristyne uses a permanent marker and just makes dots - then you join the dots; I've tried tracing the design onto a tissue-paper-type product (Goldenthreads) and tacking this onto the fabric them embroidering through and ripping away. It's not my favourite technique, but it works, especially on darker fabrics where it's hard to trace the design.
Embroidery threads: I have always used DMC threads, but there are loads of different brands out there. If you are new to embroidery, hopefully you'll have a local shop which stocks a range. Pick our your fabrics first, then go along and find a thread that matches - you'll need a thread that stands out against your background fabric. As this finished quilt will be a wall hanging and shouldn't need to be washed, maybe try some of the beautiful hand-dyed threads that are available - though if you are going to be washing your finished quilt, check that the thread is colourfast. Also, you don't want your threads to fade in daylight!
Needles: I use embroidery/crewel needles. The needles should be roughly the same thickness as the thread you are using or slightly thicker - this reduces the stress on the thread as you pull it through the fabric and keeps it looking fresh and shiny.
Sewing machine: I embroider by hand. I don't often piece by hand!
You'll also need a PDF reader and a printer to print the embroidery designs.
How to make the Applique Sections
How to make the Pieced Section [edge]
How to make the Pieced Section [corner]
Freezer paper foundation piecing tutorial
Embroidery Instructions
Block 2
Blog Post - 2nd February 2013
Embroidery design
Embroidery Instructions
Block 3
Blog Post - 2nd March 2013
Embroidery Design
Embroidery Instructions
Block 4
Blog Post - 6th April 2013
Embroidery Design
Embroidery Instructions
Block 5
Blog Post - 4th May 2013
Embroidery Design
Embroidery Instructions
Block 6
Blog Post 1st June 2013
Embroidery Design
Embroidery Instructions
Block 7
Blog Post 6th July 2013
Embroidery Design
Embroidery Instructions
Block 8
Blog Post 6th December 2013
Embroidery Design
Embroidery Instructions
Block 9
Blog Post 12th December 2013
Embroidery Design
Embroidery Instructions
Block 10
Blog Post 2nd January 2014
Embroidery Design
Embroidery Instructions
Block 11
Blog Post 18th January 2014
Embroidery Design
Embroidery Instructions
Block 12
Blog Post 1st February 2014
Embroidery Design
Embroidery Instructions
Centre block and outer borders
Blog post 3rd February 2014
Instructions for centre and borders
Dresden Template
Useful Links:
Lazy Daisy Heart Tutorial - it's in German, but the pictures are very good - if you are unsure, just get in touch.
French knots: I've found this great video tutorial that shows exactly how to do a French knot. There are a couple of extra tips I would add: don't try this stitch with a very long length of thread, because it easily knots. Don't try it with a very short length of thread because it makes things really difficult if you don't have enough thread to keep the tension. I sometimes wrap my thread round the needle three times to get a slightly bigger knot, but if you do it more than this you end up with a bullion knot, rather than a French knot, which is longer, rather than circular and bigger. If you want a bigger French knot, simply do it with more strands of embroidery thread.
If you have any questions at all, please send me an email, post a message on this page, or ask in the Flickr group! I hope you have much fun making it as I am!
I shared the final set of instructions for the quilt top on 3rd February 2014. Despite some delays during the year I hope you like the finished quilt top. All of the instructions and patterns will remain here on the blog just as long as the blog itself remains, so there is no rush to complete your project and you can join in whenever you wish. Thank you for your patience and your encouragement!
Introduction
FIRST BLOCK: 5th JANUARY2013 seems like it is going to become the year of BOMs. I've already signed up for a couple! But as well as taking part in others, I decided in the last few months that I would like to host one myself. I really hope you'll take a moment to have a look my BOM and I'd love it if you would join me.
Here is the first block!

And the SECOND BLOCK (2nd February)

The THIRD BLOCK will be available on 2nd March 2013!
(I will update this with a picture of the full block just as soon as I've made it - for now, here is the embroidery) - NOW UPDATED!

The FOURTH BLOCK will be available on 6th April 2013.

The FIFTH BLOCK will be available on 4th May 2013

The SIXTH BLOCK will be available on 1st June 2013

The SEVENTH BLOCK will be available on 6th July 2013

The EIGHTH BLOCK will be available around 3rd August (but I'm on holiday so it may be a bit early - or a bit late!) So it's actually available 06.12.2013!

The NINTH BLOCK....

The TENTH Block

The ELEVENTH block
The TWELFTH block
Just the CENTRE block left to go....
The plan is some embroidery, some tiny piecing, some applique and a finished wall-hanging sized quilt
Don't worry if you've never done any embroidery before - the designs are made up of small motifs so you can do just a couple of motifs at a time, and I'll be posting some tutorials as we go explaining the basic stitches.
There will be twelve blocks plus a centre and each block will reflect a month of the year and a colour from the colour wheel to give a rainbow finish. There will also be a straightforward applique section to each block and pieced section.
Of course, if tiny piecing isn't really your thing, then the size of the embroidery will fit perfectly in a 7" diameter embroidery hoop, or you could make a mini quilt for each month with a simple coloured border.
If you are thinking about taking part, I'd love it if you grabbed the button and added it to your blog
What will you need to play along?
I have bought a lot of fabric recently, and it's about time I started using it, so I will be using fabric in my stash. In fact the pieces are so small you can use your scraps. I'm going for a rainbow look, but if you have loads of scraps in just one colour, there's nothing to stop you from changing the colours around.
What you will need is 1 metre of the fabric you will use for the embroidery (ETA - you may find that 1.5m is safer - sorry). I've chosen Kona White. To further stabilise this fabric, I back my embroideries with a product called Bosal Fashion Fuse - it's a light weight fusible interfacing, and I think it makes my embroidery neater! I get mine from my LQS. Weaveline is another product I have used in the past (and I struggle to tell the difference). The Bosal Fashion Fuse is only 23" wide, so you'll need 180cm minimum.
I also find a Sew Line mechanical pencil to be invaluable for transferring the embroidery design onto the fabric - there is grey for transferring to light fabrics and yellow for transferring to dark fabrics. There are, of course, other ways of transferring your design onto your fabric: for example Kristyne uses a permanent marker and just makes dots - then you join the dots; I've tried tracing the design onto a tissue-paper-type product (Goldenthreads) and tacking this onto the fabric them embroidering through and ripping away. It's not my favourite technique, but it works, especially on darker fabrics where it's hard to trace the design.
Embroidery threads: I have always used DMC threads, but there are loads of different brands out there. If you are new to embroidery, hopefully you'll have a local shop which stocks a range. Pick our your fabrics first, then go along and find a thread that matches - you'll need a thread that stands out against your background fabric. As this finished quilt will be a wall hanging and shouldn't need to be washed, maybe try some of the beautiful hand-dyed threads that are available - though if you are going to be washing your finished quilt, check that the thread is colourfast. Also, you don't want your threads to fade in daylight!
Needles: I use embroidery/crewel needles. The needles should be roughly the same thickness as the thread you are using or slightly thicker - this reduces the stress on the thread as you pull it through the fabric and keeps it looking fresh and shiny.
Sewing machine: I embroider by hand. I don't often piece by hand!
You'll also need a PDF reader and a printer to print the embroidery designs.
Links
As each block is released, I'll post a link to it on this page so it's always easy to find.General Instructions:
How to prepare your embroideryHow to make the Applique Sections
How to make the Pieced Section [edge]
How to make the Pieced Section [corner]
Freezer paper foundation piecing tutorial
Block 1
Embroidery designEmbroidery Instructions
Block 2
Blog Post - 2nd February 2013
Embroidery design
Embroidery Instructions
Block 3
Blog Post - 2nd March 2013
Embroidery Design
Embroidery Instructions
Block 4
Blog Post - 6th April 2013
Embroidery Design
Embroidery Instructions
Block 5
Blog Post - 4th May 2013
Embroidery Design
Embroidery Instructions
Block 6
Blog Post 1st June 2013
Embroidery Design
Embroidery Instructions
Block 7
Blog Post 6th July 2013
Embroidery Design
Embroidery Instructions
Block 8
Blog Post 6th December 2013
Embroidery Design
Embroidery Instructions
Block 9
Blog Post 12th December 2013
Embroidery Design
Embroidery Instructions
Block 10
Blog Post 2nd January 2014
Embroidery Design
Embroidery Instructions
Block 11
Blog Post 18th January 2014
Embroidery Design
Embroidery Instructions
Block 12
Blog Post 1st February 2014
Embroidery Design
Embroidery Instructions
Centre block and outer borders
Blog post 3rd February 2014
Instructions for centre and borders
Dresden Template
Useful Links:
Lazy Daisy Heart Tutorial - it's in German, but the pictures are very good - if you are unsure, just get in touch.
French knots: I've found this great video tutorial that shows exactly how to do a French knot. There are a couple of extra tips I would add: don't try this stitch with a very long length of thread, because it easily knots. Don't try it with a very short length of thread because it makes things really difficult if you don't have enough thread to keep the tension. I sometimes wrap my thread round the needle three times to get a slightly bigger knot, but if you do it more than this you end up with a bullion knot, rather than a French knot, which is longer, rather than circular and bigger. If you want a bigger French knot, simply do it with more strands of embroidery thread.
If you have any questions at all, please send me an email, post a message on this page, or ask in the Flickr group! I hope you have much fun making it as I am!
Comments
Liebe Grüße Grit
I just found this delightful BOM. You are a very busy lady! I admire your industry. Are you planning to continue it or is it something you put aside to in order to prepare for your wonderful new project (baby, LOL)?
Best wishes and thanks.