
I love to make gifts for people at Christmas. At least for the people who I know will appreciate them. Having made a quilt for our childminder as a commission in the summer (it was a quilt she gifted), I was determined to make her one as a Christmas present. We are so lucky that we found Alison - it was pure chance - she had just set up as a childminder, and I had just decided to go back to work. We hadn't planned anything in advance, and she was new so had spaces available. She was the best decision we ever made for our kids. They love her and she loves them. She has two children who are a bit older, and it's like our girls have older siblings. The quilt is for all of them, so I picked a design that was fun and colourful. And I'd been looking for an excuse to try out Elizabeth Hartman's Pineapple Farm pattern!
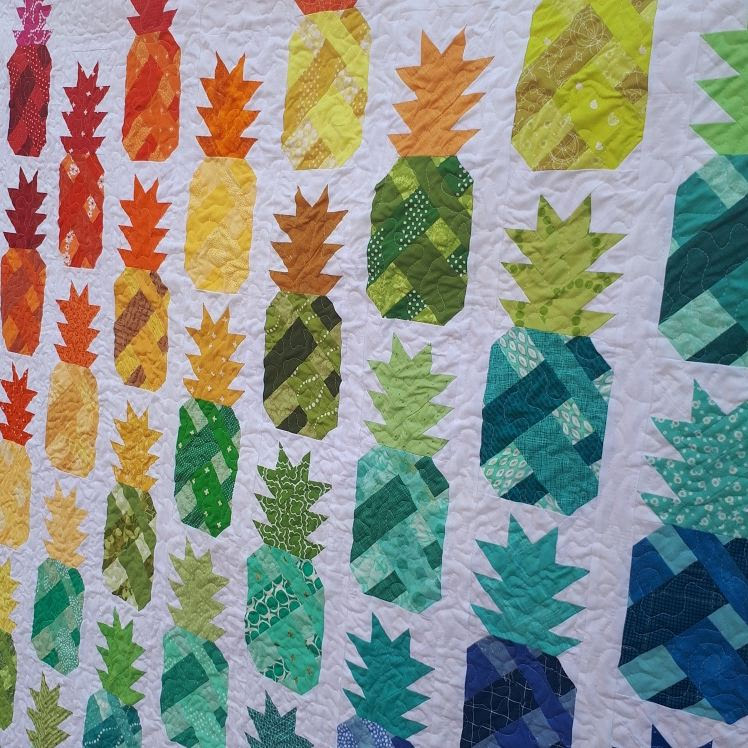

Each of the blocks is pieced in two parts: the bottom, which can be made up using chain piecing, and is then trimmed, and the leaves, which can't be chain pieced, but are also trimmed. It took me a while to find a routine, but eventually I found that the most efficient way for me to make these blocks was to make four sets of leaves at a time, thus allowing me to chain piece, and then making four bodies individually, then joining it all up. Trimming the leaves was easy enough, as the pattern provides you with where to expect certain points and seams to fall, but I found it harder to trim the bottom. Here is top tip number two. Knowing I had forty of these blocks to make and trim, I stuck washi tape onto my 12.5" ruler which could be lined up with seam lines on the block. That way all the blocks would be trimmed the same (can you spot the one I lined up wrong?).

In October, forty pineapples sounded easy. In November, 36 pineapples sounded like a challenge. By December 32 pineapples sounded impossible! Especially as I hadn't even cut them all by this point... but a deadline was exactly what I needed. It had to be gifted at 5pm on 22nd December. The latest opportunity for quilting it was my day off on.... 22nd December. I could baste it on 18th December at our local sewing group. So by bedtime on 17th December I needed a quilt top (did I mention I was away with work for three nights?). I knuckled down and by 9am on 17th all of the blocks were done and trimmed. What you may have twigged at this point, is that the seams in the blocks are on point, and by trimming them, every single edge of the block was a bias edge. Sashing is not my favourite thing at the best of times but this one nearly got me. The first row seemed to be three inches too long. Whaaaaat. So I pieced the next one, and it was within the fudgeable margin. But the blocks are off-set, so I had to piece a third column and check it was the right length, which it was near enough, before I could attached that first column, line up the seams in the correct places and "encourage" the fabric to behave... There may have been some choice language. And then once you're done with the sashing, there were still the borders to add. 8pm on 17th December and I had a quilt top.


My original plan had been to quilt it with vertical straight lines, but the reality of the deadline, meant that I changed my mind and quilted it with an all over stipple (with some flower thrown in too). It was the same quilting I'd used on the commissioned quilt in the summer, which they had loved, so I was quite confident it would be ok! The bias edges still caused me bother even at this stage, and there are a couple of bits of seriously dodgy quilting! But the overall is fine and with a few washes no-one will notice.

It's bound in Alison Glass Sunprints in the lovely green - on of my favourite fabrics - must restock! And backed with a duvet from Dunelm.

I am chuffed to bits I got this finished! And it's a Finish Along finish - you can find my original list here!

It's bound in Alison Glass Sunprints in the lovely green - on of my favourite fabrics - must restock! And backed with a duvet from Dunelm.

I am chuffed to bits I got this finished! And it's a Finish Along finish - you can find my original list here!

Comments