Whilst I'm away from home I've been working on some Dear Jane blocks. I've tried regular piecing by hand in the past with somewhat dubious results, so to piece by hand I use the English Paper Piecing technique. This is a great way to do inset seams, which is something I'm not great at on the machine (having started my double wedding ring, I will be getting a lot of practice of this). On my last post I shared a very bad photo of block D-2: Mouse in the Mirror. So here it is again, with better lighting:

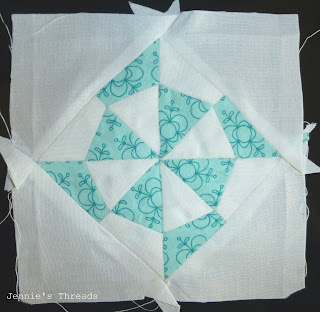
I've also completed B-9 Tinker Toy
 The fabric is Oval Elements from Art Gallery
Wendy then asked me how I do my blocks with EPP, so I thought I'd share a little tutorial. This isn't the only way to do it, and it most likely isn't the best way, but this is my way.... the block is F-1: Big top and the fabric is from Lecien.
I start by tracing the block design from the book onto freezer paper. I just lay it over and mark the corners on the dull side of the freezer paper, then remove it from the book and use a ruler to join the points I've marked. I then take some card - I'm using up birthday cards and Christmas card for this - they are almost too stiff, so what you really need are cheap Christmas cards/birthday cards! Cereal packets would be fine too. You get the idea.
Iron the freezer paper, shiny side down, to the card - don't use steam and don't linger with the iron or you will scorch the card and the iron. If you are using card with a different design on each side, this is better (especially for blocks where the pieces are not symmetrical). If your card is plain on both sides, get a pen and scribble all over the back - it helps later, honestly!
Now cut up the card using the freezer paper as a guide, on every line. Be careful - because you didn't spend long ironing the freezer paper, it will come off quite easily - you need it to stay until you have at least cut every line. I find it helpful to lay out the pieces in the correct position as I cut them up. This will also help you when you baste your fabric! By this time the freezer paper will have fallen off...
 I cut my fabric using a rotary cutter into squares and rectangles (and HSTs) big enough to cover the shape and leave a generous seam allowance. Before I baste, I postition the paper onto the fabric and trim to shape, still leaving a very generous and not particularly accurate seam allowance! This results in some wastage, but nearly every scrap is big enough for a 1/4" hexie.... but that's another project I have in mind :)
Baste your fabric to the paper in your preferred manner - I use thread (not glue) in a contrasting colour. If the pieces in your block are symmetrical, like in the turquoise block above (the one in oval elements), it doesn't matter which side you baste the fabric too, but if the pieces aren't, like in the other blocks, always baste to the same side (this is where your scribbles will help you recognise one side from the other). I start by basting the shortest side, then work round from the back in an anti clockwise direction. Make sure that any side that will be along the edges of your block, has more than a 1/4" seam allowance, so you can trim it down at the end. Again, I put the pieces back in the correct place, especially if this is a block with lots of pieces.

Once basted I stitch my pieces together using whipstitch and quilting thread for extra strength - if you get your stitches small enough, you can't see them!

Once finished I remove all of my papers (even from the edges). I'm lucky enough to have an ironing board in my hotel room - press your block, making sure that the seam allowances on the outside of your block are pressed out. This can be a bit fiddly.... you can also trim some of your more generous seam allowances in the rest of the block at this point.
I need to a bit of applique before I can call this block finished.
The final step it to take your rotary cutter and ruler and trim the block to size, leaving just a quarter inch seam allowance, so that when you come to piecing it by machine, you can do so in exactly the same way as for all other techniques.
I hope this is clear, but should you have any questions, just let me know!

I've also completed B-9 Tinker Toy

Wendy then asked me how I do my blocks with EPP, so I thought I'd share a little tutorial. This isn't the only way to do it, and it most likely isn't the best way, but this is my way.... the block is F-1: Big top and the fabric is from Lecien.
I start by tracing the block design from the book onto freezer paper. I just lay it over and mark the corners on the dull side of the freezer paper, then remove it from the book and use a ruler to join the points I've marked. I then take some card - I'm using up birthday cards and Christmas card for this - they are almost too stiff, so what you really need are cheap Christmas cards/birthday cards! Cereal packets would be fine too. You get the idea.
Iron the freezer paper, shiny side down, to the card - don't use steam and don't linger with the iron or you will scorch the card and the iron. If you are using card with a different design on each side, this is better (especially for blocks where the pieces are not symmetrical). If your card is plain on both sides, get a pen and scribble all over the back - it helps later, honestly!
Now cut up the card using the freezer paper as a guide, on every line. Be careful - because you didn't spend long ironing the freezer paper, it will come off quite easily - you need it to stay until you have at least cut every line. I find it helpful to lay out the pieces in the correct position as I cut them up. This will also help you when you baste your fabric! By this time the freezer paper will have fallen off...

Baste your fabric to the paper in your preferred manner - I use thread (not glue) in a contrasting colour. If the pieces in your block are symmetrical, like in the turquoise block above (the one in oval elements), it doesn't matter which side you baste the fabric too, but if the pieces aren't, like in the other blocks, always baste to the same side (this is where your scribbles will help you recognise one side from the other). I start by basting the shortest side, then work round from the back in an anti clockwise direction. Make sure that any side that will be along the edges of your block, has more than a 1/4" seam allowance, so you can trim it down at the end. Again, I put the pieces back in the correct place, especially if this is a block with lots of pieces.

Once basted I stitch my pieces together using whipstitch and quilting thread for extra strength - if you get your stitches small enough, you can't see them!

Once finished I remove all of my papers (even from the edges). I'm lucky enough to have an ironing board in my hotel room - press your block, making sure that the seam allowances on the outside of your block are pressed out. This can be a bit fiddly.... you can also trim some of your more generous seam allowances in the rest of the block at this point.

I need to a bit of applique before I can call this block finished.
The final step it to take your rotary cutter and ruler and trim the block to size, leaving just a quarter inch seam allowance, so that when you come to piecing it by machine, you can do so in exactly the same way as for all other techniques.
I hope this is clear, but should you have any questions, just let me know!
Comments