
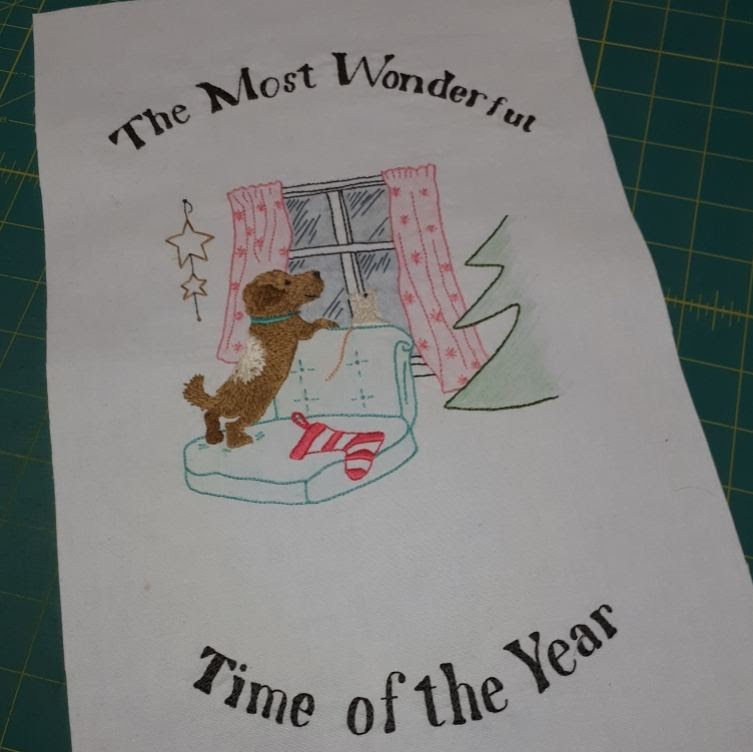
There is nothing quite like an impending deadline to get a project finished, and that was certainly the case with this finish. Advent starts on 1st December (in terms of advent calendars, anyway) and Jessica needed an advent calendar. It might have been better if I'd started it earlier... the first challenge was picking out a design. Like Mia's I wanted there to be a central embroidery, surrounded by the pockets, but I could not find an embroidery that fitted the bill. It wasn't until I changed my search to "Christmas Line Drawings" that an absolute gem popped up. It's a Christmas card design and it's perfect. Jessica loves standing on the sofa looking out of the window, and she loves dogs! I needed to make it bigger, so I added some words and then my mother-in-law had a brainwave - I could add the side of a Christmas tree and the final pocket could be a present under it! Perfect!
Challenge number 2 was picking a colour scheme. In the end I went with aquas, pinks, greens and greys, based on a focus fabric that didn't make it into the finished calendar! This colour scheme caused problem number three. I wanted to try a new-to-me technique where instead of solid embroidery, you use colouring pencils to add colour to background items - like the chair and the curtains. I couldn't believe how difficult it was to find a light aqua colouring pencil. My daughters have many packs of crayons...nothing. I ordered a single "aquamarine" pencil from Amazon... too dark. I ordered Stabilo pencils from Amazon that looked ever so promising in the picture... nothing. Time was pressing so in the end I used the dark colour I had and went over it with a lime green - I hadn't banked on colour blending on my first attempt. I'm quite pleased with the result, but I would have like to seat to have been more saturated - I'm very pleased with the curtains.

Not content with one new technique, I was up for a second. I wanted to completely fill the dog and the mouse with embroidery - not flat satin stitch, but long and short stitch that would shows the shape and replicate fur. I think I was holding my breath as I stitched up the dogs head, and when I was done, and held it up and had a good look, I was pretty pleased. The rest of the dog came together very quickly, followed by Mr. Mouse who was tricky because he was smaller. I loved the way the curtains changed as I added the stitching over the colour, and adding the window frames made the whole picture come to life. But the words... I seriously underestimated how long they would take to finish, and it was that section of the project that nearly sank it.
I finished the embroidery on the evening of 30th November, and was very, very glad I had already made the pockets at that point. It came together quite quickly as a quilt top, and I was left to just add the binding on 1st December before the girls came home for the day.

I can happily confirm that Jessica loves it. However, I think that may have more to do with the fact it contains chocolate that the fact that Mummy lovingly embroidered it. I enjoy looking at the embroidery, and I'm sure she will in years to come as well!

I've added a photo of Mia's advent calendar below. I made a conscious decision not to refer back to Mia's as I was making Jessica's so that they would be different (as my girls are different). It's interesting to see how similar, yet slightly different they are. It wasn't until I hung them side by side that I realised Mia's has no binding! If you'd like to see more of Mia's advent calendar, you can find a blog post here from 2015 when I made it.

This is a finish from my Quarter 4 Finish Along List.

Comments